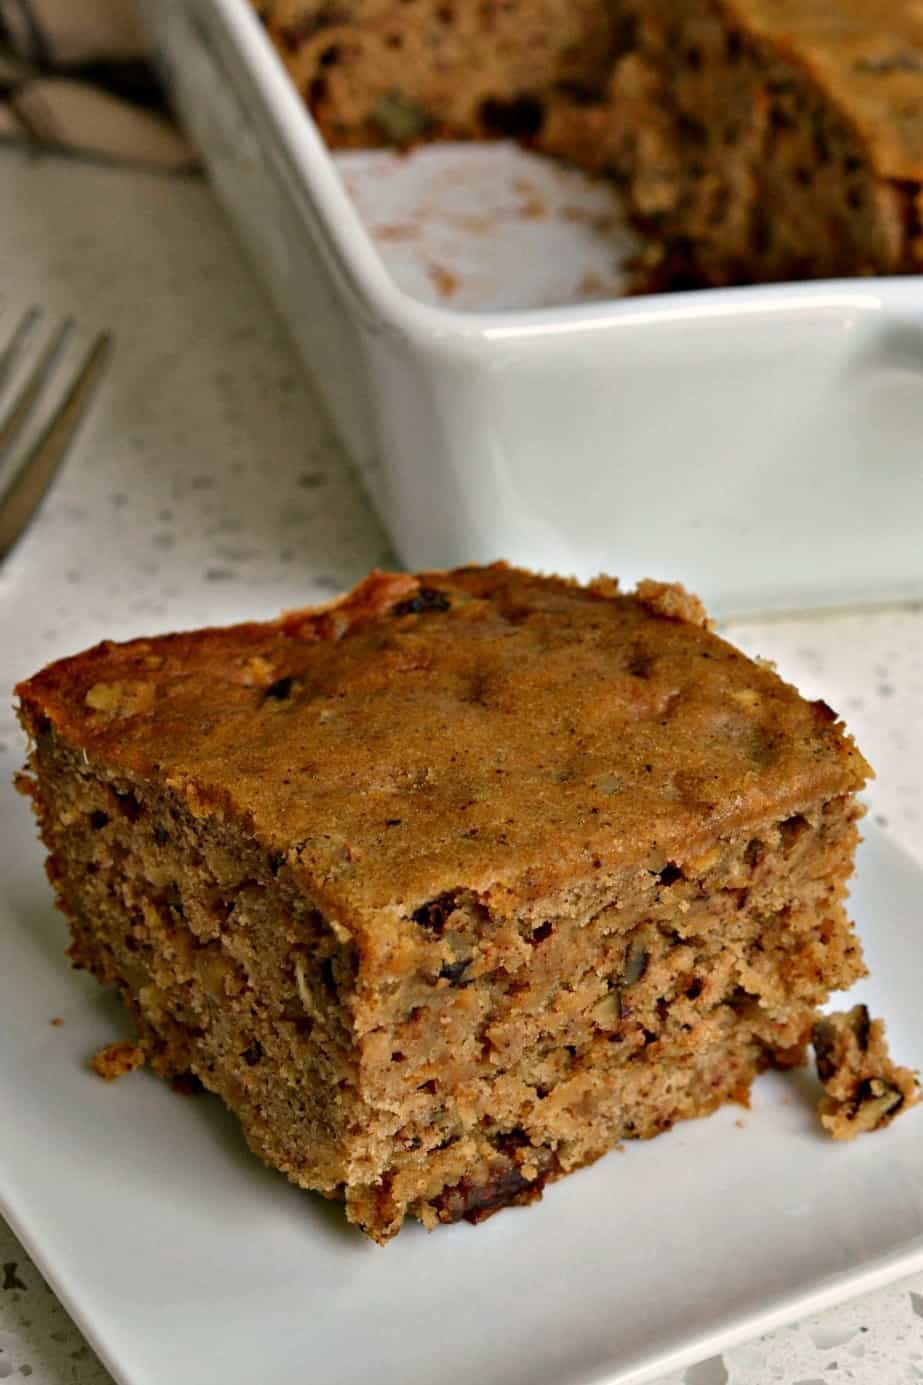
How To Make A Layered Applesauce Cake
Ingredients
For a moist and scrumptious layered applesauce cake, begin with the muse: the cake itself. This usually involves all-purpose flour, the workhorse of many baking recipes, offering structure and texture.
Granulated sugar is essential, offering sweetness and moisture. The amount can be adjusted to your preference, bearing in mind that applesauce already contributes a degree of sweetness.
Baking powder acts as a leavening agent, inflicting the cake to rise fantastically. Baking soda might also be included, often at the aspect of an acidic ingredient, to further improve the leavening course of and create a lighter crumb.
Eggs bind the ingredients together, adding richness and moisture. They contribute to the cake’s construction and help create a tender crumb.
Unsalted butter, or a substitute like vegetable oil, adds richness and taste. Butter lends a more pronounced, buttery style, whereas oil ends in a moister, perhaps barely denser cake.
Applesauce is the star ingredient! It adds moisture and a subtle sweetness, replacing some or all the oil or butter. Unsweetened applesauce is usually most popular to manage the general sweetness.
Milk or buttermilk adds moisture and helps create a young crumb. Buttermilk, with its acidity, can react with the baking soda for a extra tender and flavorful cake.
Vanilla extract offers a classic taste that enhances the applesauce fantastically. Other extracts, similar to cinnamon or nutmeg, can be added for a extra spiced cake.
For the frosting, you may probably need powdered sugar, which creates a clean and candy frosting. Butter, again, adds richness and creaminess, making the frosting easier to unfold and enhancing the flavour.
Milk or cream helps adjust the consistency of the frosting. A little at a time ensures you achieve the desired spreadable consistency, not too thick and not too thin.
Vanilla extract, or other flavorings, may be added to the frosting to enhance the cake. A pinch of salt balances the sweetness of the frosting.
Optional additions to the cake batter could embody spices like cinnamon, nutmeg, or allspice for a warm, spiced cake. Chopped nuts, raisins, or cranberries can add texture and taste complexity.
For decoration, you might contemplate extra sprinkles, chopped nuts, or even a drizzle of caramel sauce or melted chocolate to enhance the applesauce cake’s inherent flavors.
Remember to examine the standard and freshness of your ingredients earlier than beginning, guaranteeing the absolute best results on your layered applesauce cake.
For the Applesauce Cake:
• 2 half cups all-purpose flour
• 2 teaspoons baking soda
• 1 teaspoon floor cinnamon
• 1/2 teaspoon ground nutmeg
• 1/4 teaspoon floor cloves
• 1/2 teaspoon salt
• 1 half of cups granulated sugar
• 1 cup (2 sticks) unsalted butter, softened
• 4 giant eggs
• 1 cup unsweetened applesauce
• 1 teaspoon vanilla extract
• 1 cup buttermilk
For the Cream Cheese Frosting:
• eight ounces cream cheese, softened
• half of cup (1 stick) unsalted butter, softened
• 3-4 cups powdered sugar
• 1 teaspoon vanilla extract
• Pinch of salt
For the Apple Filling (optional, but highly recommended):
• 2 medium apples (Granny Smith, Honeycrisp, or a blend), peeled, cored, and thinly sliced
• 1/4 cup granulated sugar
• 1 tablespoon lemon juice
• half teaspoon ground cinnamon
• 1 tablespoon butter
For the Applesauce (if making your own, in any other case use store-bought):
• 6-8 medium apples (tart varieties like Granny Smith work best), peeled, cored, and chopped
• half of cup water (or apple juice for enhanced flavor)
• 1/4 cup granulated sugar (adjust to style depending on apple sweetness)
• half of teaspoon ground cinnamon (optional)
• Pinch of ground nutmeg (optional)
Notes on Ingredients:
• All-purpose flour: Provides the structure of the cake.
• Baking soda: Leavens the cake, creating a lightweight and airy texture. Ensure it’s contemporary.
• Spices (cinnamon, nutmeg, cloves): Offer heat, autumnal flavors that complement the applesauce and apples.
• Salt: Enhances the flavors of the other ingredients.
• Granulated sugar: Sweetens the cake.
• Butter: Adds richness and moisture. Make certain it’s softened to room temperature for proper creaming with the sugar.
• Eggs: Bind the ingredients together and add richness.
• Applesauce: Adds moisture and a subtle apple taste. Unsweetened is greatest to manage the general sweetness.
• Vanilla extract: Enhances the overall taste.
• Buttermilk: Adds tang and moisture. If you don’t have buttermilk, you may make a substitute by adding 1 tablespoon of lemon juice or vinegar to 1 cup of milk and letting it sit for 5-10 minutes.
• Cream cheese: Forms the base of a rich and tangy frosting.
• Powdered sugar: Sweetens the frosting.
• Apples (for the filling): Tart apples maintain their shape higher when baked. Sweet apples will work but could become mushy.
• Lemon juice (for the filling): Prevents the apples from browning.
• Apples (for selfmade applesauce): Choose a range that balances tartness and sweetness.
• Water (for selfmade applesauce): Helps the apples to melt and break down while cooking.
For the Applesauce Cake:
2 half cups all-purpose flour, spooned and leveled
2 teaspoons baking soda
1 teaspoon ground cinnamon
1/2 teaspoon ground nutmeg
1/4 teaspoon ground cloves
1/2 teaspoon salt
1 half of cups granulated sugar
1 cup unsweetened applesauce
1/2 cup vegetable oil
2 large eggs
1 teaspoon vanilla extract
1 cup strong brewed espresso, cooled (or milk)
For the Cream Cheese Frosting:
8 ounces cream cheese, softened to room temperature
1/2 cup (1 stick) unsalted butter, softened to room temperature
3-4 cups powdered sugar, sifted
1 teaspoon vanilla extract
Pinch of salt
2-4 tablespoons milk or cream, for desired consistency
(Optional) 1/4 cup chopped pecans or walnuts, toasted
(Optional) 1/4 cup dried cranberries, chopped
(Optional) A dash of cinnamon for added heat within the frosting
Note: The amount of powdered sugar and milk/cream within the frosting may need adjustment relying on the desired consistency. Start with 3 cups and add more progressively until you achieve a clean, spreadable frosting. Similarly, ingredient quantities for the cake may be adjusted slightly depending on pan dimension and desired cake top.
Cake Preparation
Before you even take into consideration touching the wet components, meticulously measure out all your dry parts. Accuracy is key to a well-balanced cake.
Begin with the flour. Use a kitchen scale for the most exact measurement, aiming for the weight laid out in your recipe quite than relying solely on volume measurements from a measuring cup. Spoon the flour flippantly into the cup to keep away from packing it down, which outcomes in a denser cake.
If your recipe calls for cake flour, use it; all-purpose flour will yield a special end result. Cake flour has a decrease protein content, resulting in a more tender crumb.
Next, measure out the granulated sugar. Again, a scale is beneficial, but when using a measuring cup, gently spoon the sugar into the cup, avoiding compression. The sort of sugar (granulated, superfine, and so forth.) will have an effect on the texture and sweetness of your cake; stick to the recipe’s directions.
Now, add the leavening agents. This usually consists of baking powder and baking soda. Ensure these are contemporary; old leavening brokers may end up in a flat cake. Carefully measure them using a spoon and stage them off with a straight edge, avoiding scooping from the container.
Some recipes may also embody salt. Salt enhances the flavors of the opposite elements and is crucial for proper leavening. Measure it precisely, sometimes utilizing a pinch or a small measuring spoon.
If your recipe incorporates spices like cinnamon or nutmeg, meticulously measure them as nicely. A small amount can make an enormous difference in taste, so accuracy is crucial. Use a measuring spoon and level it off.
Once all of the dry ingredients are measured, sift them collectively. Sift the flour, sugar, leavening agents, salt, and spices by way of a fine-mesh sieve into a big bowl. Sifting aerates the dry ingredients, preventing lumps and guaranteeing a light and fluffy texture in the completed cake.
After sifting, gently whisk the dry components along with a whisk or a spatula. This ensures that every one the leavening agents and spices are evenly distributed all through the flour and sugar. Avoid overmixing, as this can develop the gluten in the flour, leading to a tricky cake.
A few mild whisks are all that’s necessary to mix the dry components, leaving the combination comparatively light and airy. This step units the stage for the smooth incorporation of the moist components later on.
Keep the sifted dry components aside in a cool, dry place while you put together the moist components. This prevents the leavening brokers from reacting prematurely.
Remember to wash your measuring tools completely after each use to ensure accuracy in future baking endeavors.
Properly measuring and mixing the dry ingredients is key to baking a successful layered applesauce cake. Take your time, be precise, and benefit from the process!
The success of a layered applesauce cake hinges significantly on the proper mixture of moist elements. This stage, often ignored, instantly impacts the cake’s texture, moisture, and overall flavor.
Begin by guaranteeing all of your wet components are at room temperature. This is essential for even mixing and correct emulsification. Cold components can lead to a lumpy batter and a less-than-ideal cake construction.
Typically, for an applesauce cake, your moist elements will embrace applesauce, eggs, oil (or melted butter), and milk or buttermilk. The precise portions will vary depending on your specific recipe.
Start by adding the eggs to a big bowl. If utilizing a stand mixer, use the paddle attachment. If utilizing a hand mixer, ensure your bowl is sturdy and huge sufficient to accommodate the elements with out spilling.
Beat the eggs vigorously till they are mild, frothy, and pale in colour. This incorporates air, leading to a lighter and fluffier cake. The beating time is dependent upon the ability of your mixer and might take wherever from 2 to five minutes.
Next, gradually add the oil or melted butter to the overwhelmed eggs. Pour the oil in a gradual, regular stream whereas mixing on low velocity. This prevents the oil from separating from the eggs.
Once the oil is absolutely incorporated, add the applesauce. Applesauce provides moisture and a delicate sweetness, so it’s essential to incorporate it completely. Again, add it steadily whereas mixing on low to medium speed.
If your recipe calls for vanilla extract or another flavoring agent, now is the time to add it. A few drops of almond extract or a teaspoon of cinnamon can beautifully complement the applesauce flavor.
Finally, add your milk or buttermilk. The kind of milk influences the cake’s total texture. Buttermilk offers a tangier taste and a slightly more tender crumb. Gradually add the milk, mixing till just mixed. Overmixing at this stage can develop the gluten within the flour (added later), resulting in a troublesome cake.
Scrape down the edges and bottom of the bowl to make sure all ingredients are nicely included. The mixture must be clean and freed from any lumps. If there are any remaining lumps, it’s completely acceptable to softly whisk them out. Avoid vigorously mixing at this stage as it could over-mix the batter.
Once the wet ingredients are perfectly mixed, you possibly can proceed to rigorously incorporate the dry components, normally flour, baking soda, baking powder, and spices, following the directions in your specific recipe. Remember the gentle folding movement to keep away from over-mixing.
The careful and methodical combining of the wet ingredients is fundamental to producing a moist, flavorful, and structurally sound layered applesauce cake. Attention to detail at this stage ensures a pleasant baking experience and a scrumptious consequence.
Before combining wet and dry ingredients, ensure all elements are at room temperature. This promotes even mixing and prevents lumps.
For the wet elements of our layered applesauce cake, we’ll sometimes have applesauce, oil (vegetable or canola), eggs, milk (or buttermilk for a tangier flavor), and vanilla extract. Measure each ingredient accurately using a kitchen scale or measuring cups and spoons.
In a large bowl, whisk collectively the moist components. Don’t overmix; simply until they’re well mixed and homogenous. The aim is to create a easy, emulsified base.
For the dry components, we’ll need flour (all-purpose or a blend for a lighter texture), baking powder, baking soda, salt, and cinnamon (optional, but enhances the apple flavor). Again, exact measuring is essential.
In a separate, giant bowl, whisk collectively the dry components. This ensures the leavening agents (baking powder and soda) are evenly distributed, stopping pockets of uneven rising within the cake.
The key to a successful cake lies in the light incorporation of the wet and dry ingredients. We do not wish to overmix, as this develops gluten, leading to a tricky cake.
Gradually add the dry ingredients to the moist elements, a third at a time. Begin by adding a few third of the dry components to the moist components and gently fold them collectively using a rubber spatula or a big spoon.
Folding includes a delicate up-and-over motion, incorporating the dry components with out overmixing. Avoid stirring in a round motion.
After the first third of the dry ingredients is incorporated, add one other third and repeat the folding course of. Be patient and work methodically.
Finally, add the remaining dry components and gently fold them in till just combined. A few small lumps are acceptable; don’t strive for a perfectly clean batter.
Once all elements are mixed, scrape down the sides and bottom of the bowl to ensure every thing is evenly blended.
Avoid overmixing. Overmixing develops the gluten in the flour, resulting in a troublesome and chewy cake. The batter must be smooth however not overly combined.
The batter should be thick sufficient to carry its form but not so thick that it’s difficult to unfold evenly into the cake pans.
Before pouring the batter into prepared cake pans, gently tap the bowl on the counter a number of times to launch any trapped air bubbles.
For a layered applesauce cake, divide the batter evenly between the ready cake pans.
Bake based on your recipe instructions, testing for doneness with a toothpick or cake tester inserted into the center of each layer. The toothpick ought to come out clear.
Let the cakes cool in the pans for a few minutes before inverting them onto a wire rack to chill utterly before frosting and layering.
Using this technique of mixing moist and dry components, you’ll ensure a light, fluffy, and moist layered applesauce cake.
Begin by preheating your oven to 350°F (175°C). Grease and flour two 9-inch spherical cake pans. This prevents sticking and ensures straightforward removing later.
In a large bowl, cream together 1 ½ cups (3 sticks) of unsalted butter and 2 ½ cups of granulated sugar until mild and fluffy. This is crucial for a tender crumb; use an electrical mixer for finest outcomes.
Beat in 4 massive eggs one at a time, mixing properly after every addition. Scrape down the sides of the bowl to make sure everything is included.
In a separate bowl, whisk together three cups of all-purpose flour, 2 teaspoons of baking soda, 1 teaspoon of ground cinnamon, ½ teaspoon of ground nutmeg, and ½ teaspoon of salt. This dry ingredient combination ought to be completely combined to keep away from lumps.
Gradually add the dry components to the wet components, alternating with 1 cup of unsweetened applesauce, starting and ending with the dry elements. Mix on low velocity till just mixed. Overmixing develops gluten and ends in a tricky cake.
Divide the batter evenly between the prepared cake pans. Spread the batter evenly in each pan to ensure even baking.
Bake for 30-35 minutes, or till a picket skewer inserted into the middle comes out clean. Baking occasions can range depending in your oven, so regulate them.
Let the cakes cool in the pans for 10 minutes earlier than inverting them onto a wire rack to cool fully. Cooling fully is crucial before frosting to prevent melting.
While the cakes are cooling, put together your frosting. A classic cream cheese frosting pairs beautifully with applesauce cake. This sometimes entails beating together softened cream cheese, butter, powdered sugar, and vanilla extract until clean and creamy.
Once the cakes are utterly cool, stage the tops with a serrated knife if essential to create even layers. This ensures a neat and professional-looking finished cake.
Place one cake layer on a serving plate or cake stand. Frost the highest evenly with a generous layer of frosting.
Carefully place the second cake layer on top of the frosted layer. Frost the complete cake with the remaining frosting, making a clean finish. You can use a spatula or offset spatula for this.
For an extra touch, you can beautify the cake with cinnamon, chopped nuts, or apple slices. Allow the completed cake to sit for no much less than half-hour before serving to permit the flavors to meld.
Store leftover cake in an hermetic container at room temperature for as much as 3 days or within the refrigerator for as a lot as per week. Refrigerated cake might be finest served at room temperature.
Adjust sweetness to your preference by including kind of sugar. You also can experiment with totally different spices like cloves or allspice to create unique flavor profiles.
Consider including raisins, chopped apples, or walnuts to the batter for added texture and flavor. This will barely change the baking time, so regulate your cake.
Enjoy your scrumptious homemade layered applesauce cake! Remember to at all times comply with security guidelines when using the oven and dealing with hot baking pans.
Applesauce Preparation
To begin crafting a layered applesauce cake, the muse lies in perfectly ready applesauce. This starts with deciding on the right apples.
A mix of sweet and tart apples works best; consider Honeycrisp, Fuji, Granny Smith, or Braeburn. The tartness balances the sweetness of the cake, stopping it from being overly sugary.
For peeling, a vegetable peeler is your best friend. Hold the apple firmly and run the peeler along the pores and skin in a smooth, even motion. Avoid urgent too hard to forestall eradicating too much of the fruit’s flesh.
If you prefer a faster method, you can use a paring knife, however this requires more skill and precision to avoid nicks and cuts. Remember to carefully remove the stem and blossom ends as nicely.
Once peeled, the following step is chopping. Consistency is vital for even cooking and a easy applesauce. Dice the apples into roughly ½-inch to ¾-inch pieces. Smaller pieces will prepare dinner quicker, leading to a smoother sauce.
Alternatively, you can use a food processor for chopping, which can produce a more uniform size and form, rushing up the preparation. However, watch out to not over-process and create apple purée.
To forestall browning, a typical incidence with apples, immediately place the chopped apples in a bowl of water blended with a squeeze of lemon juice. The acid within the lemon juice helps inhibit the oxidation course of that causes browning.
Once all apples are peeled and chopped, you’re able to make the applesauce. This typically entails simmering the apples with a contact of water or apple juice and spices similar to cinnamon, nutmeg, or allspice, to boost the flavor.
The cooking process will soften the apples and break them down. You can obtain the desired consistency by adjusting the simmering time; longer cooking leads to a smoother, extra purée-like sauce. A potato masher or immersion blender can help in creating the perfect consistency after cooking.
For the layered cake itself, the applesauce will usually be incorporated into the cake batter, making a moist and tender crumb. The layers are then stacked, typically with a cream cheese frosting or other complementary filling between them.
Remember, the standard of your applesauce instantly affects the final taste and texture of the cake. Taking the time for proper peeling and chopping will end in a superior applesauce and an exceptional layered applesauce cake.
Here’s a summary of the method:
- Select apples: A mix of sweet and tart varieties.
- Peel apples: Use a peeler or paring knife rigorously.
- Chop apples: Dice into ½-inch to ¾-inch pieces for even cooking.
- Prevent browning: Submerge chopped apples in lemon water.
- Make applesauce: Simmer apples with water/juice and spices.
- Adjust consistency: Simmer longer for smoother applesauce; use a masher or blender if wanted.
Following these steps will lead to a delightful layered applesauce cake.
To start crafting a layered applesauce cake, the inspiration lies in completely simmered applesauce. This is not your jarred selection; we’re aiming for a selfmade richness that can elevate your cake.
First, select your apples. A blend of tart and sweet apples is right. Granny Smith, Honeycrisp, and Braeburn are glorious choices. The tartness balances the sweetness, preventing a cloying end result.
Peel, core, and chop the apples into roughly equal-sized pieces. Consistency is essential for even cooking. Smaller pieces will simmer faster than bigger ones.
Place the chopped apples in a heavy-bottomed saucepan. A Dutch oven or a thick-based chrome steel pot works best. The even warmth distribution prevents scorching.
Add a small quantity of liquid to the pan. Water is adequate, but apple cider or juice provides a deeper flavor profile. About 1/4 cup to half of cup must be sufficient, depending on the amount of apples.
Toss the apples gently with the liquid to coat them evenly. This ensures they don’t persist with the underside of the pan.
Add a pinch of salt to boost the natural sweetness of the apples. A touch of cinnamon or different warming spices is also welcome, based on your desire.
Place the saucepan over medium-low heat. Simmering, not boiling, is essential. Boiling will break down the apples too shortly, leading to a mushy, uneven texture.
Cover the saucepan partially. This permits some steam to flee whereas sustaining moisture.
Simmer gently for 20-30 minutes, or till the apples are tender and easily pierced with a fork. Stir often to prevent sticking.
Once the apples are tender, take away the saucepan from the warmth. You can use a potato masher or an immersion blender to achieve your desired consistency. For a layered cake, a barely chunky applesauce works properly to retain some texture.
If you need a smoother applesauce, you’ll be able to strain it via a fine-mesh sieve to remove any remaining solids or skins.
Allow the applesauce to cool utterly before incorporating it into your cake batter. This prevents the batter from changing into too thin or runny.
For the layered cake itself, you may think about these options:
- Alternating layers: Create layers of cake batter and applesauce in your cake pan.
- Swirled layers: Gently swirl the applesauce into the batter before baking for a marbled effect.
- Filling: Use the applesauce as a filling between layers of a conventional cake.
Remember to regulate baking time according to your recipe and the size of your pan, because the added moisture from the applesauce may have an result on the baking time slightly.
With perfectly simmered applesauce as your base, your layered applesauce cake is sure to be a pleasant and moist success.
Applesauce, a key ingredient in many cakes, including our layered applesauce cake, advantages from cautious preparation to ensure optimum texture and taste.
Begin by choosing apples appropriate for applesauce. Tart varieties like Granny Smith, Honeycrisp, or Braeburn offer a great steadiness of sweetness and acidity, stopping the cake from turning into overly candy.
Wash and core the apples completely. Peeling is optional; some favor leaving the skins on for added texture and vitamins, however guarantee any blemishes are removed.
Cut the apples into roughly 1-inch chunks. Smaller items will cook sooner, promoting even pureeing.
There are two primary methods for cooking the apples: stovetop and oven.
Stovetop Method:
-
Place the apple chunks in a large saucepan with a small quantity of water or apple juice (about 1/4 cup). This prevents sticking and provides moisture.
-
Cook over medium heat, stirring sometimes, till the apples are very tender, about 15-20 minutes. The apples should simply mash with a fork or spoon.
-
Reduce warmth to low and simmer for a further 5-10 minutes, permitting excess moisture to evaporate and the applesauce to thicken barely.
Oven Method:
-
Toss the apple chunks with a tablespoon of lemon juice (to stop browning) and a sprinkle of cinnamon or different desired spices.
-
Spread the apples in a single layer on a baking sheet.
-
Bake in a preheated oven at 375°F (190°C) for 20-30 minutes, or till tender. The actual time will depend in your oven and the size of the apple chunks.
Once the apples are cooked, allow them to cool barely before pureeing.
Pureeing can be accomplished using a quantity of strategies:
-
Potato Masher: For a chunkier applesauce, use a potato masher to roughly crush the apples. This is ideal for cakes where some texture is desired.
-
Immersion Blender: An immersion blender is a convenient method to achieve a smooth, consistent puree instantly in the pot.
-
Food Processor or Blender: For the smoothest applesauce, course of the cooked apples in a meals processor or blender till utterly easy. Work in batches if necessary, to avoid overloading the appliance.
After pureeing, taste and regulate the sweetness as needed. You can add a touch of sugar, maple syrup, or honey to your desire.
For the layered applesauce cake, a smoother puree is generally most popular to create a moist and tender crumb. However, relying in your desired texture, a barely chunkier applesauce also can work nicely.
Once the applesauce is ready, enable it to cool utterly earlier than incorporating it into your layered applesauce cake batter. This ensures that the batter stays at the appropriate temperature for optimal baking.
Remember to store leftover applesauce in an hermetic container within the fridge for as much as every week.
Layering the Cake
Once your applesauce cake layers are baked and have rested within the pans for about 10 minutes, the crucial subsequent step is cooling them completely earlier than frosting. This prevents the frosting from melting and making a soggy mess.
Gently run a skinny knife or offset spatula across the edges of each layer to loosen it from the pan.
Invert each layer onto a wire rack placed on high of a baking sheet to catch any drips.
Allow the layers to cool utterly at room temperature, ideally for no less than 2-3 hours. A fully cooled cake may also frost extra evenly.
If you are quick on time, you can pace up the cooling course of barely by inserting the wire rack with the cakes in the fridge for an hour or so, but keep away from refrigerating for too lengthy, as it could have an result on the moisture content material of the cake.
Once the layers are completely cool, you probably can begin leveling them. If the tops are domed, use a serrated knife to carefully slice off the uneven parts. Aim for even, flat surfaces for neat layering.
Crumb coat the layers. This is a thin layer of frosting applied to every layer to entice crumbs and create a clean surface for the final frosting. It’s the necessary thing to a professional-looking layered cake.
Chill the crumb-coated cake for about half-hour in the refrigerator. This helps the crumb coat set and prevents crumbs from moving into your last frosting layer.
After chilling, frost the cake fully, spreading the frosting evenly throughout the top and sides. Consider utilizing a turntable for easier frosting and a extra polished look.
You also can add ornamental components such as recent apples, cinnamon, or a dusting of powdered sugar after the frosting is complete.
Proper cooling is crucial for each taste and appearance. An improperly cooled cake shall be tough to frost, resulting in a messy and fewer appealing final product. Patience is vital during this step.
Remember to always deal with your cooled cake layers gently to keep away from breaking or damaging them. Use a spatula or knife to rigorously switch them to your cake board or serving plate.
For a very tall layered cake, you may want to make use of cake dowels or helps within the middle to forestall the layers from compressing underneath the burden of the frosting. This is especially essential for moist cakes like applesauce cake.
Finally, once your cake is frosted and decorated, enable it to sit for no much less than 30 minutes to allow the frosting to set earlier than serving. This will prevent it from smudging or transferring to serving plates.
Using a pastry bag with completely different suggestions allows for numerous frosting designs and ornamental touches, including a touch of magnificence to your layered applesauce cake.
Enjoy the fruits of your labor – actually and figuratively!
This recipe utilizes a novel layering method to create a moist and flavorful applesauce cake. The applesauce is not merely mixed into the batter, but somewhat layered throughout the cake itself, resulting in pockets of intense applesauce taste all through.
First, prepare your applesauce. You can use do-it-yourself or store-bought; nevertheless, selfmade provides a more intense taste. Ensure your applesauce is completely smooth with no lumps. If using chunky applesauce, pressure it via a fine-mesh sieve for a better texture.
Next, prepare your cake batter. A simple vanilla cake batter works greatest, permitting the applesauce flavor to shine. Cream together your butter and sugar until mild and fluffy. Add your eggs separately, mixing properly after each addition. In a separate bowl, whisk together your dry ingredients (flour, baking powder, baking soda, salt). Gradually add the dry components to the wet elements, alternating along with your milk (or buttermilk for a tangier flavor), beginning and ending with the dry elements. Mix until just combined—overmixing will lead to a tricky cake.
Now comes the layering. Grease and flour a 9×13 inch baking pan. Pour about 1/3 of the cake batter into the pan and unfold evenly. Top with 1/3 of the applesauce, spreading it evenly over the batter. Repeat this course of two more occasions, ending with a layer of cake batter.
Swirl the applesauce and batter gently with a knife or toothpick, creating a marbled effect if desired. This step is optional; leaving distinct layers may even lead to a scrumptious cake.
Bake the cake in a preheated oven at 350°F (175°C) for roughly 30-35 minutes, or till a toothpick inserted into the center comes out clean. Check for doneness across the 30-minute mark, as oven temperatures can range.
Once baked, let the cake cool completely in the pan earlier than frosting. This prevents the frosting from melting or becoming uneven.
For frosting, a easy cream cheese frosting or a basic buttercream frosting pairs well with the applesauce cake. You can even get artistic and use a cinnamon cream cheese frosting for a heat, spiced flavor to enrich the applesauce.
Once the cake has cooled completely, frost it generously. You might additionally mud it with powdered sugar for an easier finish.
Tips for success:
- Use good quality elements. The taste of the cake will rely closely on the standard of the applesauce and different ingredients.
- Don’t overmix the batter. Overmixing develops the gluten within the flour, resulting in a tricky cake.
- Check for doneness earlier than the minimal baking time is up. Ovens can vary in temperature.
- Let the cake cool completely before frosting to forestall melting.
- Get inventive with the frosting! Use different flavors and decorations to personalize your cake.
Enjoy your scrumptious layered applesauce cake! This unique recipe is bound to be a crowd-pleaser.
Begin by getting ready your applesauce cake layers based on your chosen recipe. Ensure each layer is completely cool before proceeding to prevent the frosting from melting.
Once cooled, degree the tops of the layers utilizing a serrated knife or cake leveler. This creates a flat, even floor for optimal stacking and frosting.
Place the first layer on a cake board or serving platter. This supplies stability and simple transport.
Generously frost the highest of the first layer together with your chosen frosting. Don’t skimp on the frosting; a thick layer helps create a moist and scrumptious cake.
Carefully place the second layer on high of the frosted first layer. Gently press down to make sure even contact.
Repeat the frosting process, generously frosting the highest of the second layer. If utilizing more than two layers, proceed this process till all layers are stacked.
Once all layers are stacked, frost the entire cake. Begin by making a crumb coat. This is a skinny layer of frosting that acts as a glue, trapping any unfastened crumbs and creating a easy surface for the ultimate frosting layer.
Chill the cake in the refrigerator for no much less than 30 minutes to allow the crumb coat to set. This prevents the final frosting layer from being absorbed into the cake.
After chilling, apply the final layer of frosting. Use a spatula or offset spatula to create a clean, even finish. For a wonderfully clean end, think about using a bench scraper.
Depending in your desired look, you can create totally different frosting designs. You can obtain a simple, smooth finish, or create swirls, rosettes, or different ornamental elements.
If desired, add ornamental components such as sprinkles, recent fruit, chocolate shavings, or candies.
Once the cake is fully frosted and embellished, chill it again for at least 15 minutes to allow the frosting to set and agency up.
Before serving, rigorously remove the cake from the fridge and allow it to come back to room temperature barely for optimal taste and texture.
For a neater presentation, use a cake adorning turntable to rotate the cake whereas frosting, guaranteeing a fair and constant utility of frosting.
Consider using different piping suggestions for varied frosting designs. Star tips, round tips, and leaf ideas all create distinct visible results.
If your frosting is too thick, add a small amount of milk or cream to skinny it out. If it’s too thin, add powdered sugar until it reaches your required consistency.
When leveling the cake layers, use a long, easy sawing movement with the knife to avoid crumbling the cake.
Remember to clean your tools incessantly, particularly when switching between totally different frostings or decorations.
Practice makes perfect! Don’t be discouraged in case your first try is not flawless. With slightly persistence and follow, you’ll master the artwork of layering and frosting an attractive applesauce cake.
Enjoy your delicious, homemade layered applesauce cake!
Optional Additions
For an extra dimension of taste in your layered applesauce cake, think about adding warming spices like cinnamon, nutmeg, and allspice to the cake batter itself. A teaspoon of every, or a mixture to your liking, will infuse the cake with a comforting autumnal aroma and taste.
Beyond the basic trio, consider experimenting with cardamom. Its distinctive, slightly sweet and floral notes can beautifully complement the applesauce’s sweetness and create a sophisticated flavor profile. A quarter to half a teaspoon can be an excellent place to begin.
Ginger, both floor and crystallized, provides another exciting choice. Ground ginger lends a heat, spicy kick, while crystallized ginger adds a delightful textural contrast and bursts of intense ginger taste. Use sparingly, maybe a half teaspoon of floor ginger or a tablespoon of finely chopped crystallized ginger.
A pinch of cloves provides a deep, barely pungent warmth, though it is best used judiciously as it might possibly overpower different flavors if used excessively. A quarter teaspoon ought to be greater than sufficient.
For a more exotic twist, contemplate incorporating a touch of star anise. Its licorice-like flavor adds an intriguing complexity, notably if you’re utilizing apples with a tart profile. Just a number of crushed star anise seeds would be adequate.
Don’t overlook the potential of black pepper! A tiny pinch of freshly floor black pepper can surprisingly improve the sweetness of the applesauce and add a refined complexity to the general taste. Its sharpness cuts through the sweetness, creating a balanced style.
If you like a citrusy notice, a zest of lemon or orange may be included into the batter. This bright citrusy element will counterbalance the heat of the spices and add a refreshing zing.
To improve the flavor even further, consider infusing the applesauce itself with spices earlier than including it to the cake batter. Simmering the applesauce with cinnamon sticks, cloves, and a little orange zest will create a deeply flavored base on your cake.
Once the cake is baked, you probably can additional amplify the spice profile by dusting the layers with a combination of powdered sugar and cinnamon, or by making a spiced cream cheese frosting. The frosting can incorporate any of the spices mentioned above, in addition to a contact of vanilla extract for added depth.
Remember to taste as you go and regulate the spice ranges according to your preference. Start with smaller quantities and progressively enhance until you achieve your required taste intensity. The beauty of spices lies of their capability to be customized to your preferences.
Finally, think about the type of applesauce you’re using. A tart applesauce will pair nicely with stronger spices, whereas a sweeter applesauce might require a extra delicate contact.
Experimentation is key! Don’t be afraid to attempt completely different spice combos and discover the perfect blend for your layered applesauce cake.
For an additional layer of flavor and texture, think about adding elective nuts to your layered applesauce cake.
Walnuts, with their rich, buttery flavor, pair fantastically with the sweetness of applesauce and cake. Chopped walnuts may be incorporated into the cake batter itself for a refined nutty presence throughout, or sprinkled between the layers for added crunch.
Pecans provide a similar richness to walnuts, however with a barely sweeter and extra delicate taste. Their larger size makes them perfect for sprinkling between layers, creating a visually interesting distinction against the applesauce cake.
Almonds, either sliced or slivered, present a barely extra assertive flavor than walnuts or pecans. They add a pleasant crispness and a nice almond aroma to the cake. Consider toasting the almonds before including them to reinforce their flavor and create a deeper, more intense aroma.
Hazelnuts offer a unique, slightly earthy taste that enhances the applesauce fantastically. Their smaller size allows for a extra even distribution all through the batter, creating a delicate but distinct nutty flavor in each chew.
Macadamia nuts, known for his or her creamy texture and buttery taste, are an expensive addition. Their delicate flavor will not overpower the other elements, offering a complicated contact to the layered cake.
Pistachios, with their vibrant green hue and subtly sweet flavor, present a wonderful visual and a nice flavor contrast. Their unique flavor profile adds an sudden twist to the traditional applesauce cake, making it a extra interesting and memorable dessert.
Remember to toast your nuts before adding them to the cake for a extra intense flavor and aroma. Simply spread them on a baking sheet and bake at 350°F (175°C) for 5-7 minutes, or till fragrant and lightly browned. Keep an in depth eye on them to forestall burning.
When incorporating nuts into the cake batter, make sure to fold them in gently to avoid overmixing and growing an excessive amount of gluten, which may end up in a tough cake. If sprinkling nuts between layers, use a beneficiant amount for maximum impact and texture.
For a visually interesting presentation, consider using a variety of nuts. A mixture of walnuts, pecans, and slivered almonds, as an example, creates an attractive and texturally numerous cake.
Don’t be afraid to experiment! The great factor about optionally available additions is the liberty to personalize your cake to your liking. Try completely different combinations of nuts, and even combine them with other complementary components like dried cranberries or chocolate chips, to create your individual signature layered applesauce cake.
Consider the general flavor profile you are aiming for. If you favor a more refined nutty taste, use a smaller amount of nuts, or select nuts with a milder taste. For a extra intense nutty taste, use a larger amount of nuts, or select nuts with a bolder flavor profile.
Finally, keep in mind to examine for any allergies earlier than including nuts, and all the time clearly label your baked items if nuts are included.
Beyond the basic applesauce, the layered cake presents exciting opportunities for fruit-forward additions.
Consider a layer of spiced pear compote. The subtle sweetness and mild spice complement the applesauce superbly, adding depth and complexity to the flavor profile.
For a burst of tartness, a skinny layer of cranberry sauce may be interspersed between the applesauce layers. The contrasting textures and flavors create a delightful interplay on the palate.
A layer of finely diced, flippantly caramelized figs would supply an expensive and complicated contact. Their rich, honeyed taste would pair properly with cinnamon and different warm spices typically utilized in applesauce cakes.
Another attention-grabbing option is a layer of homemade plum butter. The easy, jam-like consistency would add a unique texture, whereas the plum’s sweetness and slight tartness would balance the applesauce.
For a extra tropical twist, consider a layer of mango puree or ardour fruit curd. These vibrant fruits would introduce unexpected shiny flavors and a contact of exoticism to the cake.
If you’re aiming for a more rustic and wholesome cake, a layer of stewed rhubarb can be a incredible alternative. Its tartness provides a refreshing counterpoint to the sweetness of the applesauce.
Alternatively, incorporate finely chopped blueberries or raspberries into the applesauce batter itself, for a speckled, fruity effect throughout the cake. Their juicy nature will add moisture and a nice burst of flavor with each chew.
For a visually putting cake, think about layering different coloured fruits. For occasion, alternating layers of bright purple raspberries and golden applesauce creates an interesting contrast.
Incorporating candied fruit peel, similar to orange or lemon, within the applesauce layers offers a textural and fragrant contrast. The brilliant citrus notes cut by way of the sweetness of the applesauce, providing a refreshing twist.
Remember that the quantity of added fruit should be carefully thought-about. Too much fruit may make the cake soggy or overly dense. Start with small quantities and regulate based in your preference and the consistency of the fruit.
Before adding any fruit layer, guarantee it is correctly cooled to stop the cake from becoming overly moist or collapsing.
The secret is to experiment and find the fruit combinations that finest complement your palate and the overall flavor profile you want for your layered applesauce cake. Don’t be afraid to get artistic and explore completely different taste combinations!
Consider the seasonality of the fruit when choosing your additions for the freshest and most flavorful results.
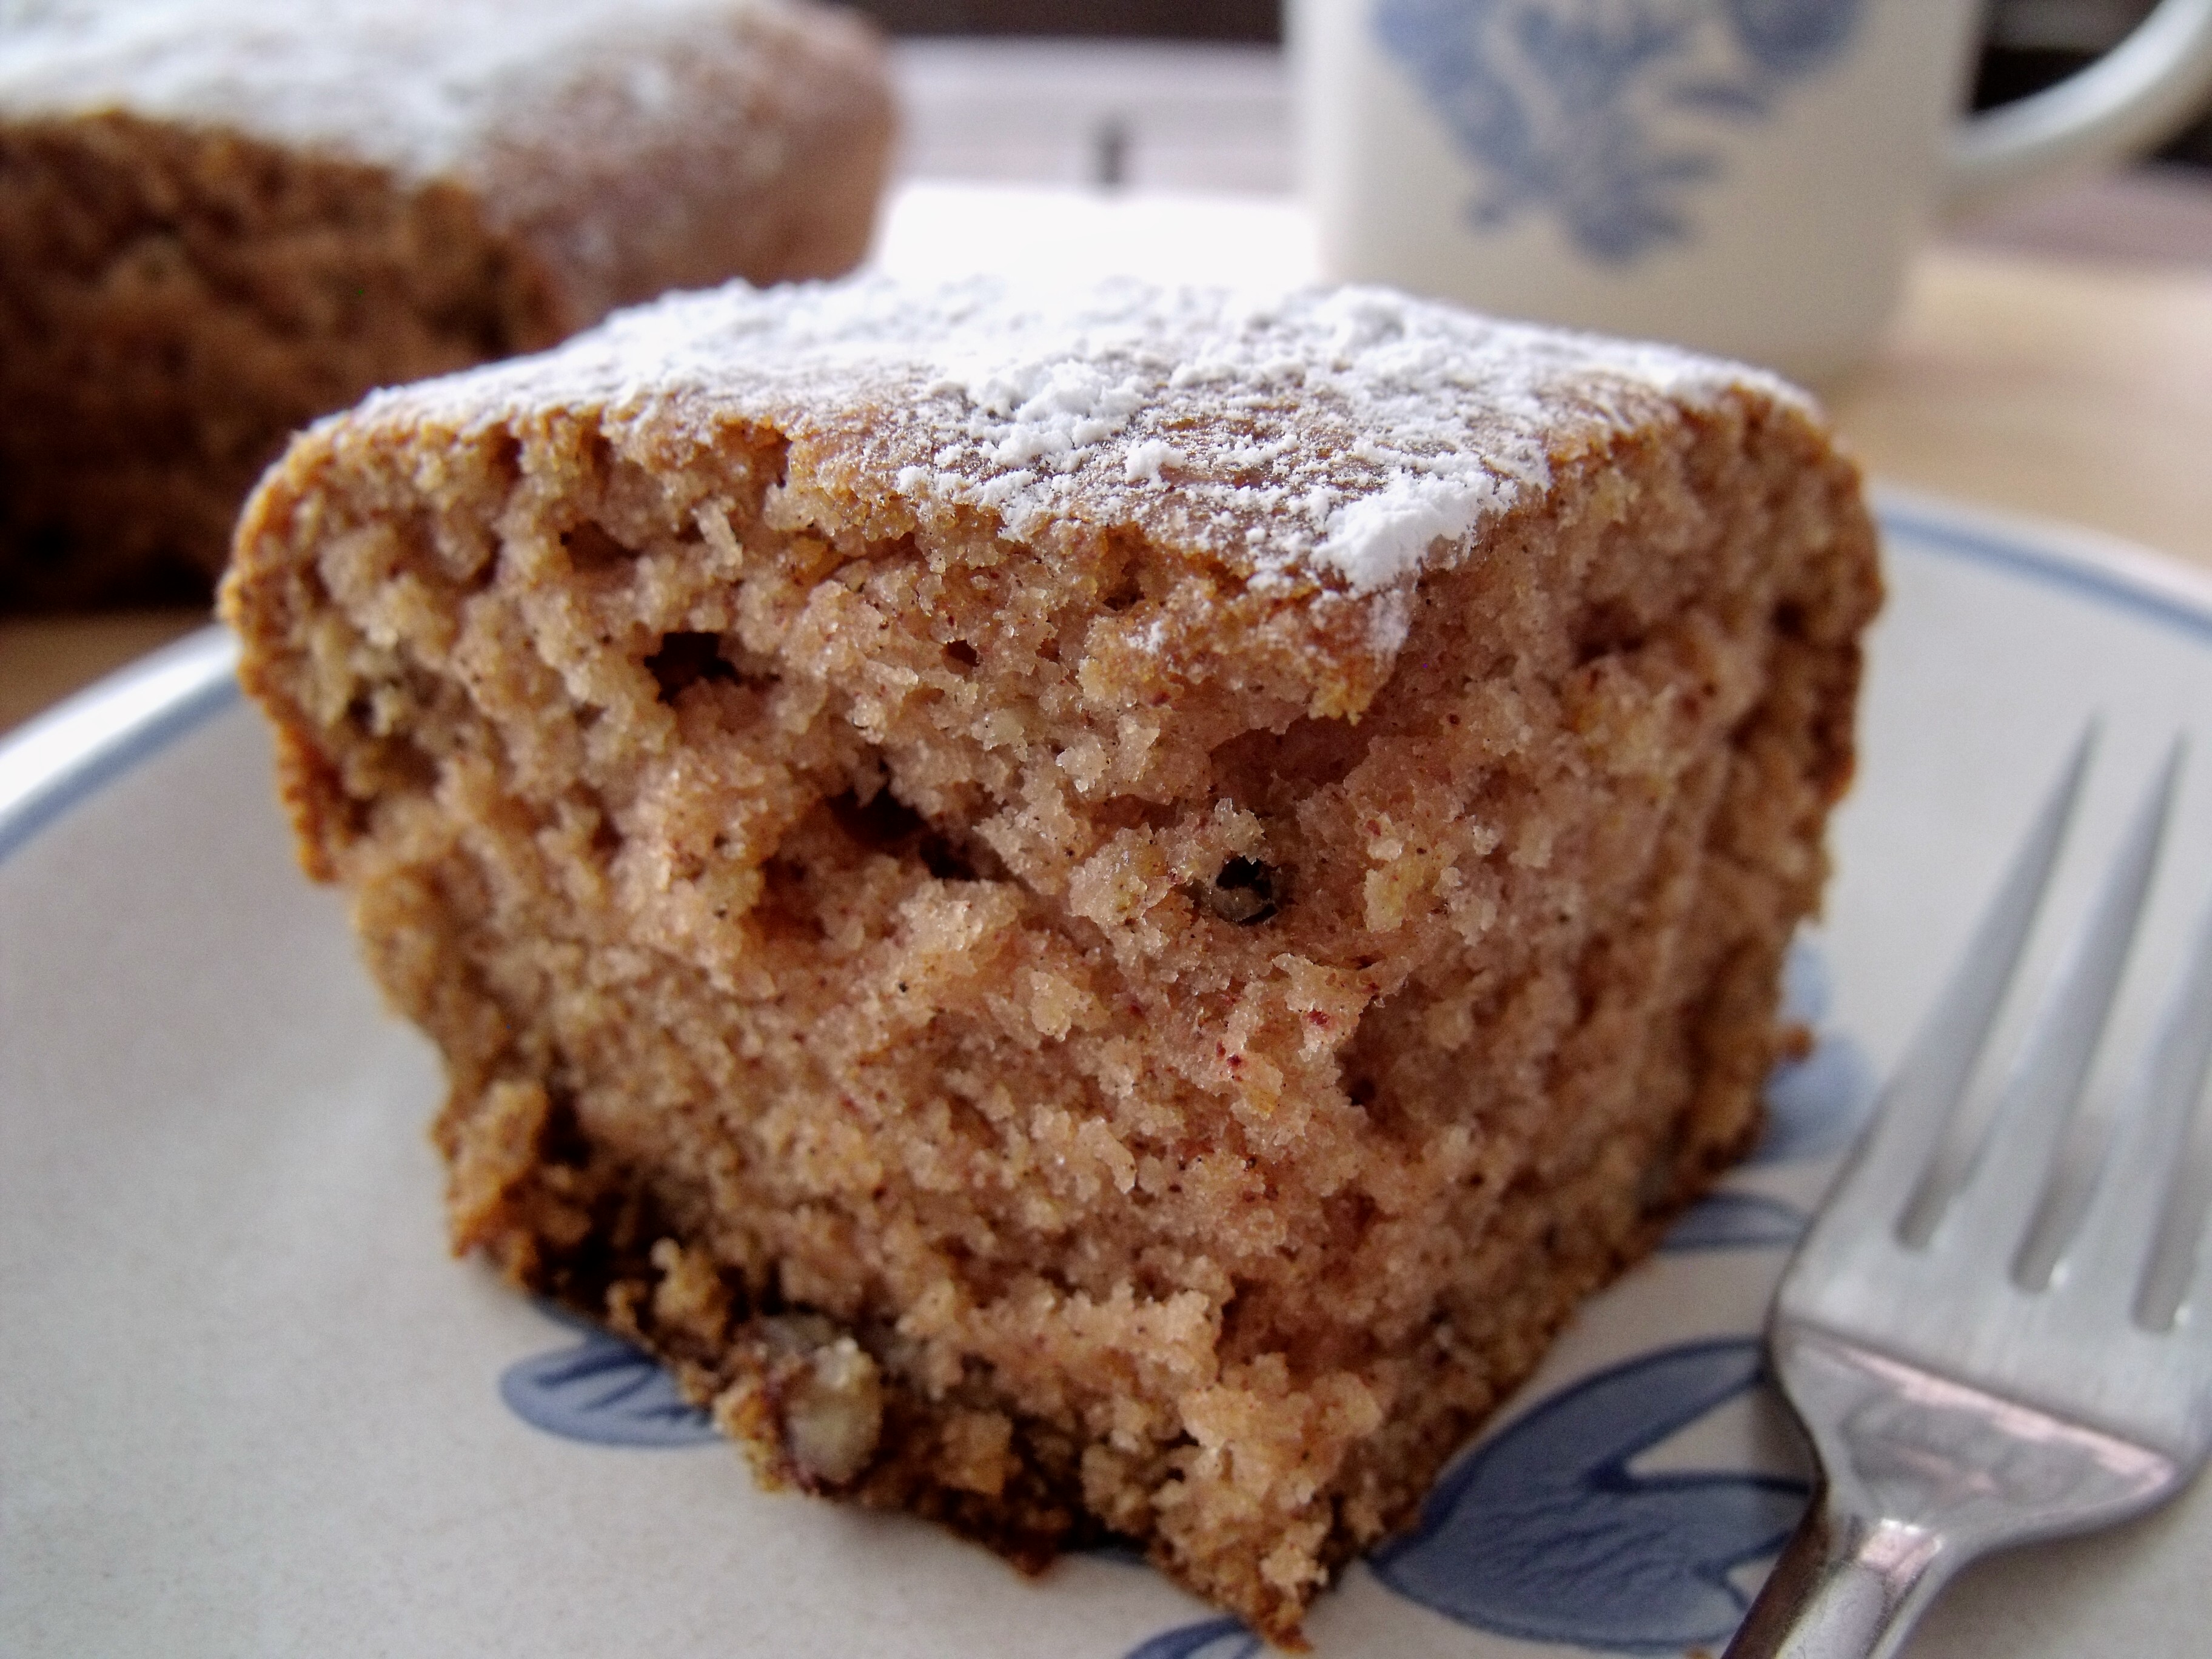
Finally, a easy dusting of powdered sugar or a drizzle of a complementary glaze can enhance the visible enchantment and add a final touch of sweetness to your masterpiece.
Serving Suggestions
For optimum enjoyment of your layered applesauce cake, contemplate serving it at room temperature. This allows the flavors to meld and the cake to keep up a moist, tender crumb.
Chilling the cake, while probably making it simpler to slice, can result in a denser texture and a less pronounced sweetness. Allowing it to sit at room temperature for a minimal of half-hour earlier than serving is beneficial.
Serving the cake barely warm, maybe after a short time in a low-temperature oven, can heighten the aroma and provide a softer, extra comforting texture. However, be cautious to keep away from over-warming, which might make the layers crumble.
Presentation is key. A easy dusting of powdered sugar, a delicate drizzle of caramel sauce, or a scattering of chopped pecans or walnuts can elevate the visual attraction.
Consider the event when choosing your serving accompaniments. For an off-the-cuff gathering, a dollop of whipped cream or a scoop of vanilla ice cream could probably be good pairings.
For a extra formal event, a lightly sweetened crème fraîche or a dusting of cinnamon might complement the applesauce taste extra subtly.
To enhance the apple notes, a aspect of spiced apple cider or a heat apple compote would create a cohesive and delicious dessert experience.
If you wish to provide a contrasting taste profile, a scoop of tart sorbet, like raspberry or lemon, would cut by way of the sweetness of the cake fantastically.
Individual servings on small plates create a extra elegant presentation, whereas a bigger cake on a cake stand allows for straightforward slicing and sharing.
Use high-quality serving plates and utensils. The presentation of your dessert ought to replicate the care taken in its preparation.
For a visually interesting association, contemplate layering slices of the cake with alternating layers of recent fruit, like berries or sliced apples, creating a delightful contrast in texture and color.
Think about garnishing the cake. A sprig of fresh mint or a number of candied apples might provide a visible and textural pop.
Don’t forget the drinks. Consider pairings like glowing apple cider, herbal teas, or a light dessert wine to complement the cake’s flavor profile.
If serving the cake to kids, contemplate smaller parts and easy accompaniments like whipped cream or a sprinkle of cinnamon.
Ultimately, one of the best serving temperature and accompanying additions will depend upon private choice. Experiment with totally different choices to discover what enhances the flavor and delight of your layered applesauce cake most effectively.
Remember to suppose about the general aesthetic. The cake must be displayed in a means that’s both appetizing and displays the occasion.
Properly storing any leftover cake is crucial. Covering it tightly in plastic wrap or storing it in an hermetic container will help preserve its moisture and freshness for later enjoyment.
Serving the cake in layers, with every layer presented individually, can add a complicated touch and improve the visual appeal. This approach works particularly nicely with a wealthy frosting or filling between layers.
Finally, do not underestimate the power of simple magnificence. Sometimes, probably the most appealing presentation is just a slice of cake, served on a clean plate, allowed to talk for itself.
Serving Suggestions for Layered Applesauce Cake:
Serve the cake at room temperature for optimal flavor and texture. Allow it to sit down for at least 30 minutes after it is cooled to permit the layers to settle and the flavors to meld.
Consider offering it alongside a scoop of vanilla bean ice cream or a dollop of whipped cream for a richer, more decadent experience.
A dusting of powdered sugar can elevate the presentation and add a delicate sweetness.
Pair the cake with a warm beverage like apple cider, spiced tea, or coffee to enhance the autumnal flavors.
For a extra subtle pairing, offer a glass of apple brandy or a light-weight dessert wine.
Serve individual slices on elegant dessert plates, garnished appropriately.
Consider slicing the cake into smaller parts for a extra manageable serving size.
For an informal setting, you could serve the cake on a cake stand, allowing visitors to assist themselves.
Garnish Ideas for Layered Applesauce Cake:
-
Candied Apples: Small, glistening candied apple slices present a wonderful and scrumptious contrast to the cake’s moist texture.
-
Cinnamon Sticks: A few cinnamon sticks arranged artfully across the cake or on individual slices add warmth and visual attraction. Their aroma additionally enhances the spice of the cake.
-
Fresh Berries: Raspberries, blueberries, or blackberries scattered throughout the top or around the edges provide a vibrant pop of color and fresh, tart flavor.
-
Caramelized Apples: Thinly sliced apples caramelized with butter and sugar supply a sweet and barely crunchy topping.
-
Whipped Cream Roses: Using a piping bag, create elegant whipped cream roses for a complicated touch.
-
Edible Flowers: Delicate edible flowers, corresponding to pansies or violas, add a touch of class and whimsy.
-
Spiced Pecans or Walnuts: Toasted pecans or walnuts, tossed with somewhat cinnamon and sugar, present a satisfying crunch and nutty flavor.
-
Chocolate Shavings: A mild dusting of darkish or milk chocolate shavings provides a contact of richness and visible interest.
-
Apple Butter Swirl: A easy drizzle of apple butter adds a layer of taste and visible texture.
-
Crystallized Ginger: Small pieces of crystallized ginger provide a spicy kick and attention-grabbing texture.
Remember to choose garnishes that complement the overall taste profile of the cake. Don’t be afraid to experiment and find your favourite combinations!
Consider the event when deciding on your garnishes. A easy dusting of powdered sugar might be good for an informal gathering, while more elaborate garnishes can be applicable for a particular celebration.
Finally, guarantee your garnishes are recent and of prime quality to reinforce the general presentation and taste of your layered applesauce cake.
Storage
Room temperature storage for baked items like an applesauce cake is crucial for maintaining texture and stopping spoilage. Ideally, the cake must be completely cooled before being saved.
Airtight containers are your finest good friend. These prevent the cake from drying out and absorbing undesirable odors from the fridge or different meals gadgets.
The kind of container issues. Plastic wrap is a short-term solution, but an hermetic container manufactured from glass or heavy-duty plastic is preferable for longer storage.
Properly masking the cake is important. Avoid leaving the cake uncovered, as this will cause fast drying and staling.
Location throughout the room is important too. Keep your cake away from direct sunlight or warmth sources, corresponding to ovens or radiators. These could cause the cake to become dry and probably spoil quicker.
Room temperature storage is mostly greatest for 2-3 days. After this time, the cake may start to lose its optimum moisture and freshness, even if stored properly.
If the recipe contains perishable elements (such as cream cheese frosting), room temperature storage period significantly reduces. These frostings ought to be refrigerated if kept for longer than a day.
For longer storage of the plain applesauce cake (without frosting), consider freezing. Wrap tightly in plastic wrap, then foil, to guard from freezer burn.
Freezing permits for longer preservation (several months), retaining a reasonable degree of high quality. Thaw the cake completely at room temperature earlier than serving. This avoids a soggy texture.
Observe for indicators of spoilage before consuming. Mold, uncommon smells, or a change in texture are all indicators the cake has gone unhealthy.
If you’re making the applesauce cake for a later date, bake and completely cool the cake the day before serving. This simplifies your preparation schedule on the day of your event.
Proper layering of the cake additionally affects storage. If using multiple layers, ensure they are evenly stacked and securely coated to keep away from drying out the interior layers.
The applesauce itself within the cake contributes to its moisture content material. Therefore, a well-made applesauce cake can typically hold its texture slightly longer at room temperature than some other kinds of cake.
Consider the local weather the place you live. In warmer, extra humid environments, you might need to shorten the room temperature storage time to forestall spoilage, even with proper containment.
Finally, all the time apply good meals safety. Wash your palms before dealing with the cake and ensure all utensils and containers are clear to stop contamination.
- Use an airtight container.
- Store in a cool, dry place away from direct sunlight.
- Do not exceed 2-3 days of room temperature storage.
- Refrigerate or freeze for longer storage.
- Check for indicators of spoilage before consuming.
While the query asks about fridge storage, it is essential to note that a layered applesauce cake, especially with frosting, is best saved in the refrigerator to stop spoilage and preserve its high quality.
Ideally, you must let the cake cool utterly earlier than refrigerating it. This prevents condensation from forming and making the frosting soggy.
Once cooled, wrap the entire cake tightly in plastic wrap. This creates an hermetic seal, minimizing exposure to air which may trigger the cake to dry out.
Alternatively, you’ll find a way to place the cake in an airtight container. A cake service with a lid is perfect, providing added safety during transport if wanted.
If you are using a container, ensure it is appropriately sized to avoid crushing the cake layers. Don’t cram it in; depart a little bit of house.
For optimum freshness, retailer the cake on a flat surface in the fridge, avoiding inserting it instantly above or under different gadgets that would affect the temperature.
Properly saved, a layered applesauce cake can last in the fridge for up to 3-4 days. However, it’s at all times best to consume it throughout the first two days for the best taste and texture.
Avoid storing the cake near strong-smelling meals, as the cake can take up these odors.
When you’re able to serve it, let the cake sit at room temperature for about 15-20 minutes to allow the frosting to soften barely and the cake to come to a extra gratifying temperature.
If you plan to freeze the cake, wrap it very properly in plastic wrap, then again in aluminum foil or place it in a freezer-safe container. Frozen layered cakes may be stored for as a lot as 2-3 months.
Remember to thaw the frozen cake completely within the refrigerator earlier than serving, permitting ample time (several hours or overnight) for even thawing.
Freezing can generally slightly have an effect on the feel of the cake, probably resulting in a slightly drier crumb, however it’s still a viable option for longer storage.
Before refrigerating or freezing, allow the cake to cool fully, guaranteeing the layers have set and the frosting has hardened. This prevents condensation and sogginess.
Always examine the frosting for any indicators of spoilage earlier than serving – uncommon colours, odors, or textures are indicators to discard the cake.
The goal is to create a barrier against air, moisture, and odors, sustaining the cake’s scrumptious flavor and texture for so long as potential.
Using high-quality ingredients in the original recipe will also significantly impact the cake’s shelf life and total deliciousness.
Following these pointers ensures your layered applesauce cake remains contemporary, moist, and gratifying for days after baking.
Before we even think about baking, let’s tackle the storage of elements, particularly applesauce, which is a vital component of a layered applesauce cake.
Applesauce Storage: Store unused applesauce in an hermetic container within the refrigerator. It can sometimes final for 3-5 days. For longer storage, freezing is beneficial.
Freezing Applesauce: To freeze applesauce, let it cool utterly. Then, pour it into freezer-safe containers, leaving about an inch of headspace for enlargement during freezing. Label the containers with the date and contents. Applesauce generally retains properly frozen for 8-12 months, though the standard could decline slightly after a yr.
You also can freeze applesauce in ice cube trays for portion management. Once frozen solid, switch the cubes to a freezer bag for easier storage.
Thawing Frozen Applesauce: To thaw frozen applesauce, switch it from the freezer to the refrigerator in a single day. This ensures protected and even thawing. You can also thaw it in a bowl of chilly water, altering the water periodically, however remember to use the thawed applesauce promptly.
Do not thaw applesauce at room temperature, as this could promote bacterial development. Microwaving is generally not beneficial for thawing applesauce both as it can affect the texture.
Other Ingredients: Other ingredients, like flour, sugar, baking powder, and eggs, must be stored in accordance with bundle directions. Flour and sugar must be kept in a cool, dry place in airtight containers to stop spoilage and bug infestation.
Cake Storage: Once the layered applesauce cake is baked and cooled, it is necessary to retailer it properly to maintain freshness and forestall it from drying out.
Short-Term Storage: Wrap the cake tightly in plastic wrap or place it in an airtight container and retailer it at room temperature for as much as three days. A cake dome is good for maintaining the cake moist and defending it from dust and crumbs.
Long-Term Storage: For longer storage (up to a week), wrap the cooled cake tightly in plastic wrap and then in aluminum foil. This helps to prevent moisture loss and keep freshness. Store it in the fridge.
Freezing the Cake: While applesauce cakes may be frozen, the texture might be barely altered upon thawing. If you select to freeze the cake, wrap it tightly in plastic wrap, then aluminum foil, and place it in a freezer-safe bag. It is finest to freeze the cake in slices to keep away from having to thaw the complete cake at once. The frozen cake could be saved for as a lot as three months.
Thawing the Frozen Cake: To thaw a frozen cake, transfer it from the freezer to the refrigerator overnight. Allow it to thaw completely before serving. Avoid thawing it at room temperature to reduce the risk of bacterial progress.
Important Note: Always ensure proper hygiene and meals security practices throughout the method, from ingredient storage to cake dealing with. Wash your palms thoroughly and use clear utensils and tools.
Proper storage and freezing strategies significantly impression the quality, style, and longevity of your layered applesauce cake.
- Always use hermetic containers for storage.
- Label and date all containers for straightforward identification.
- Follow beneficial storage instances to maintain up food safety and high quality.
- Prioritize refrigeration or freezing for extended storage.
- Thaw frozen items correctly in the refrigerator to keep away from bacterial growth.
